Python plugin tutorial
Finding examples online about OpenMaya and python plugin when you are starting to learn is always difficult! So I decided to put together a simple and basic tutorial for creating a python plugin that will create a custom node.
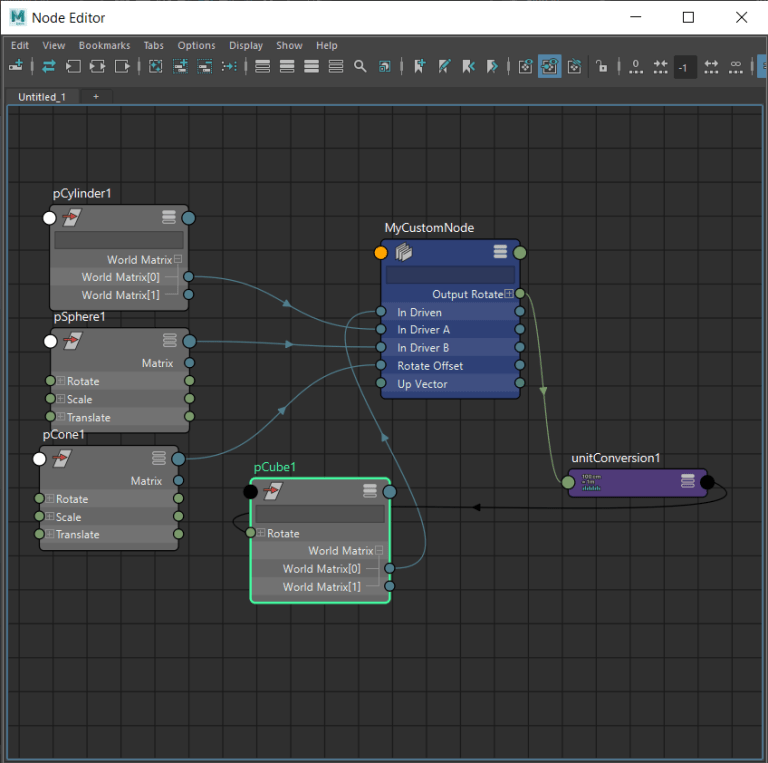
This plugin will create a node with a simple Aim constraint between a driven object and a driver object. Then we will expand it so the driven object will be guided by 2 driver objects, following each by 50%, and the option for an offset value.
To achieve this, we will be using some matrix and vector calculations, but don’t worry if you are not familiar with them, I will try to explain step by step what’s happening!
Without further delay, here is the python script. Be sure to read the yellow lines for explanation.
To install, copy this file in your /maya/plug-ins/ folder, save it as customAimConstraint.py
In a python tab, run this:
maya.cmds.loadPlugin(“customAimConstraint.py”)
maya.cmds.createNode(‘customAimConstraint’, n=’MyCustomNode’)

import maya.OpenMayaMPx as OpenMayaMPx
import maya.OpenMaya as OpenMaya


'''
To load the plugin we need to type this in the script editor:
# maya.cmds.loadPlugin("customAimConstraint.py")
# And to create our custom node, we use this:
# maya.cmds.createNode('customAimConstraint')
'''
class CustomAimConstraint(OpenMayaMPx.MPxNode):
	kPluginNodeId = OpenMaya.MTypeId(0x00047251)
	''' Define the inputs and outputs. We use MOject, and leave them empty for now. Later we will plug the correct information on them.'''
	''' The driven object '''
	mInputDriven = OpenMaya.MObject()
	''' The first driver '''
	mInputDriverA = OpenMaya.MObject()
	''' The second driver '''
	mInputDriverB = OpenMaya.MObject()
	''' We will add an offset object, so we can control rotation independently.'''
	mRotateOffset = OpenMaya.MObject()
	''' The output of the node. This will be connected to the Rotation back into the Driven object.'''
	rOutput = OpenMaya.MObject()
	''' The up vector, this one is important if we want to switch between up vector (x, y, z).'''
	upInput = OpenMaya.MObject()

	def __init__(self):
		OpenMayaMPx.MPxNode.__init__(self)

	def compute(self, plug, data):
		'''
		Maya calls this method when it determines that one of our node's output attributes, or plugs,
		is out-of-date and needs to be re-computed.
		It passes as arguments the plug that needs to be recomputed, and a data block that contains the
		current values of the input and output 	attributes for the current instance of your node.
		This compute() method is expected to re-calculate the value of the requested plug based on the
		current values of the node's input attributes, and to store the computed output values back into the data block.
		We need to assume that our node will be re-evaluated frequently, so we need to make sure its
		calculations are as efficient as possible.
		For example, during rendering a node may need to be evaluated several times per pixel.
		If you do not take care to make its computations as fast as possible,
		the dependency graph can easily become a bottleneck.
		'''
		if plug != CustomAimConstraint.rOutput:
			return OpenMaya.MStatus.kUnknownParameter
		'''
		Next we need to define a couple of matrices to store our object transform information.
		We will be declaring 4 of them, since we want 4 objects.
		Notice that this is getting the data from the inputs of the node, and using them asMatrix().
		This info comes from, when the object is connected to the node through the Node Editor,
		or through cmds.connectAttribute command.
		Matrix for our driven object.
		'''
		worldMatrixDriven = data.inputValue(CustomAimConstraint.mInputDriven).asMatrix()
		''' Matrix for our first driver object.'''
		worldMatrixDriverA = data.inputValue(CustomAimConstraint.mInputDriverA).asMatrix()
		'''
		Matrix for our second driver object. Note that this one is an extra for demonstration purposes,
		since the aim will still work 100% with only 1 Driver.
		Adding a second object will split the Driven object to follow each driver by 50% each.
		'''
		worldMatrixDriverB = data.inputValue(CustomAimConstraint.mInputDriverB).asMatrix()
		''' Matrix for our offset object. This is also not necessary, but for demonstratio purposes we will be adding
		an extra object to independently affect the rotation of the Driven object.
		 A similar approach can be used if you want to create a "Maintain Offset" option. Just store the initial
		 values of the driver.WorldMatrix here.
		 '''
		offsetMatrix = data.inputValue(CustomAimConstraint.mRotateOffset).asMatrix()
		''' We get the up input plug from the node.'''
		upV = data.inputValue(CustomAimConstraint.upInput).asInt()
		'''
		An MTransformationMatrix allows the manipulation of the individual transformation components
		(eg scale, rotation, shear, etc) of a four by four
		transformation matrix. We will store this MTransformationMatrix for each of the objects we have,
		since we will be using the Translation later.
		'''
		wmA = OpenMaya.MTransformationMatrix(worldMatrixDriven)
		wmB = OpenMaya.MTransformationMatrix(worldMatrixDriverA)
		wmP = OpenMaya.MTransformationMatrix(worldMatrixDriverB)
		''' Next we get the translation component of the translation as a vector in centimeters, again for each of the objects.'''
		transDriven = wmA.getTranslation( OpenMaya.MSpace.kTransform )
		transDriverA = wmB.getTranslation( OpenMaya.MSpace.kTransform )
		transDriverB = wmP.getTranslation( OpenMaya.MSpace.kTransform )
		'''
		MVector provides access to Maya's internal vector math library allowing vectors to be handled easily,
		and in a manner compatible with internal Maya data structures.
		Using the translation information we have from the objects, we substract both Driver's translation to our
		Driven's translation, so we know how much the objects moved in relation to the Driven.
		'''
		xv = OpenMaya.MVector(transDriven.x-transDriverA.x-transDriverB.x, transDriven.y-transDriverA.y-transDriverB.y, transDriven.z-transDriverA.z-transDriverB.z)
		''' Normalize the vector's info.'''
		xv.normalize()
		''' Based on user input, we set the vector accordingly. Can be set on run time changing the attribute directly on the node.'''
		if upV==0:
			up=[1,0,0]
		elif upV==1:
			up=[0,1,0]
		elif upV==2:
			up=[0,0,1]
		''' Here we get the vector according to what the user chose. We also need to normalize its data.'''
		zv = xv ^ OpenMaya.MVector(-up[0], -up[1], -up[2])
		zv.normalize()
		yv = xv ^ zv
		yv.normalize()
		'''
		A MMatrix provides access to Maya's internal matrix math library allowing matrices to be handled easily,
		and in a manner compatible with internal Maya data structures.
		'''
		mtx = OpenMaya.MMatrix()
		''' We create a list with all the values we obtained from our vectors. '''
		l = [xv.x, xv.y, xv.z, 0, yv.x, yv.y, yv.z, 0, zv.x, zv.y, zv.z, 0, 0, 0, 0, 1]
		''' We use MScriptUtil to convert the list into a matrix.'''
		OpenMaya.MScriptUtil.createMatrixFromList(l, mtx)
		''' Multiply times the maintain offset object's world matrix. If no input provided, matrix is unaffected'''
		mtx*=offsetMatrix
		''' Get euler rotations and convert it to radians.'''
		getFinalRot = OpenMaya.MTransformationMatrix(mtx).eulerRotation() * 57.2958
		''' Here we define the plug output of our custom node.'''
		rOutput = data.outputValue(CustomAimConstraint.rOutput)
		'''
		Convert our rotations to a MFloatVector, and assing it to the output plug,
		so that the node will write this information and we will be able to get it and connect it back to
		the rotation of our Driven, without having to use composeMatrix node in the Node Editor.
		'''
		resultRot = OpenMaya.MFloatVector(getFinalRot[0], getFinalRot[1], getFinalRot[2])
		rOutput.setMFloatVector(resultRot)
		return

''' This section initializes the plugin so Maya can read it. Python plugins can be imported from /maya/plug-ins/ folder. '''
def creator():
	return OpenMayaMPx.asMPxPtr(CustomAimConstraint())

def initialize():
	''' Here we define some varialbes that can be numeric, strings, or other type of attributes.'''
	nAttr = OpenMaya.MFnNumericAttribute()
	nMAttr = OpenMaya.MFnMatrixAttribute()
	'''
	We name our inputs. This names will be shown in the Node Editor. First value is the long name, second the short name.
	In this case, we want the upVector to be and integer, since we are expecting 0,1 or 2.
	'''
	CustomAimConstraint.upInput = nAttr.create('upVector', 'upV',OpenMaya.MFnNumericData.kInt, 0)
	''' Remember in the compute() method we need to extract the information from this input as follows:
	0 = (1,0,0) | 1 = (0,1,0) | 2 = (0,0,1)
	Set it to be writable, storable and readable, so the user can modify it.
	'''
	nAttr.setWritable(True)
	nAttr.setStorable(True)
	nAttr.setReadable(True)
	''' We set the minimum to 0 and maximum to 2.'''
	nAttr.setMin(0)
	nAttr.setMax(2)
	nAttr.setKeyable(True)
	''' Same for our driven object, but this time we expect a kDouble attribute, which will receive the WorldMatrix in the Node Editor'''
	CustomAimConstraint.mInputDriven = nMAttr.create('inDriven', 'inD',OpenMaya.MFnMatrixAttribute.kDouble)
	nMAttr.setWritable(True)
	nMAttr.setStorable(True)
	nMAttr.setReadable(True)
	nMAttr.setKeyable(True)
	''' Our first driver object.'''
	CustomAimConstraint.mInputDriverA = nMAttr.create('inDriverA', 'inA',OpenMaya.MFnMatrixAttribute.kDouble)
	nMAttr.setWritable(True)
	nMAttr.setStorable(True)
	nMAttr.setReadable(True)
	nMAttr.setKeyable(True)
	''' Second driver object.'''
	CustomAimConstraint.mInputDriverB = nMAttr.create('inDriverB', 'inB',OpenMaya.MFnMatrixAttribute.kDouble)
	nMAttr.setWritable(True)
	nMAttr.setStorable(True)
	nMAttr.setReadable(True)
	nMAttr.setKeyable(True)
	''' Offset object.'''
	CustomAimConstraint.mRotateOffset = nMAttr.create('rotateOffset', 'ro',OpenMaya.MFnMatrixAttribute.kDouble)
	nMAttr.setWritable(True)
	nMAttr.setStorable(True)
	nMAttr.setReadable(True)
	nMAttr.setKeyable(True)
	'''
	And finally our output. Notice that this type is not receiving a third argument,
	since it will be outputing the result of the compute() method.
	'''
	CustomAimConstraint.rOutput = nAttr.createPoint("outputRotate", "or")
	nAttr.setWritable(False)
	nAttr.setStorable(False)
	nAttr.setReadable(True)
	''' Once our attributes are defined, we need to add them to the node.'''
	CustomAimConstraint.addAttribute(CustomAimConstraint.upInput)
	CustomAimConstraint.addAttribute(CustomAimConstraint.rOutput)
	CustomAimConstraint.addAttribute(CustomAimConstraint.mInputDriven)
	CustomAimConstraint.addAttribute(CustomAimConstraint.mInputDriverA)
	CustomAimConstraint.addAttribute(CustomAimConstraint.mInputDriverB)
	CustomAimConstraint.addAttribute(CustomAimConstraint.mRotateOffset)
	'''
	 Finally, we need to define how they are going to interact. Since we only have 1 output, all of our inputs are going to affect it.
	attributeAffects defines when the compute() method will be called. For example, if we miss to connect upInput to rOutput, the compute()
	method will not be called if we change the upVector value, failing to recalculate our node.
	'''
	CustomAimConstraint.attributeAffects(CustomAimConstraint.upInput, CustomAimConstraint.rOutput)
	CustomAimConstraint.attributeAffects(CustomAimConstraint.mInputDriven, CustomAimConstraint.rOutput)
	CustomAimConstraint.attributeAffects(CustomAimConstraint.mInputDriverA, CustomAimConstraint.rOutput)
	CustomAimConstraint.attributeAffects(CustomAimConstraint.mInputDriverB, CustomAimConstraint.rOutput)
	CustomAimConstraint.attributeAffects(CustomAimConstraint.mRotateOffset, CustomAimConstraint.rOutput)

''' Customize plugin info and register it.'''
def initializePlugin(obj):
	plugin = OpenMayaMPx.MFnPlugin(obj, 'FelipeR', '1.0', 'Any')
	try:
		plugin.registerNode('customAimConstraint', CustomAimConstraint.kPluginNodeId, creator, initialize)
	except:
		raise RuntimeError, 'Failed to register node'

''' Call if you want to unload plugin'''
def uninitializePlugin(obj):
	plugin = OpenMayaMPx.MFnPlugin(obj)
	try:
		plugin.deregisterNode(CustomAimConstraint.kPluginNodeId)
	except:
		raise RuntimeError, 'Failed to register node'